
JavaScript Event Propagation
How events travel through the Document Object Model
August 21, 2021


Photo by Daniele Levis Pelusi on Unsplash
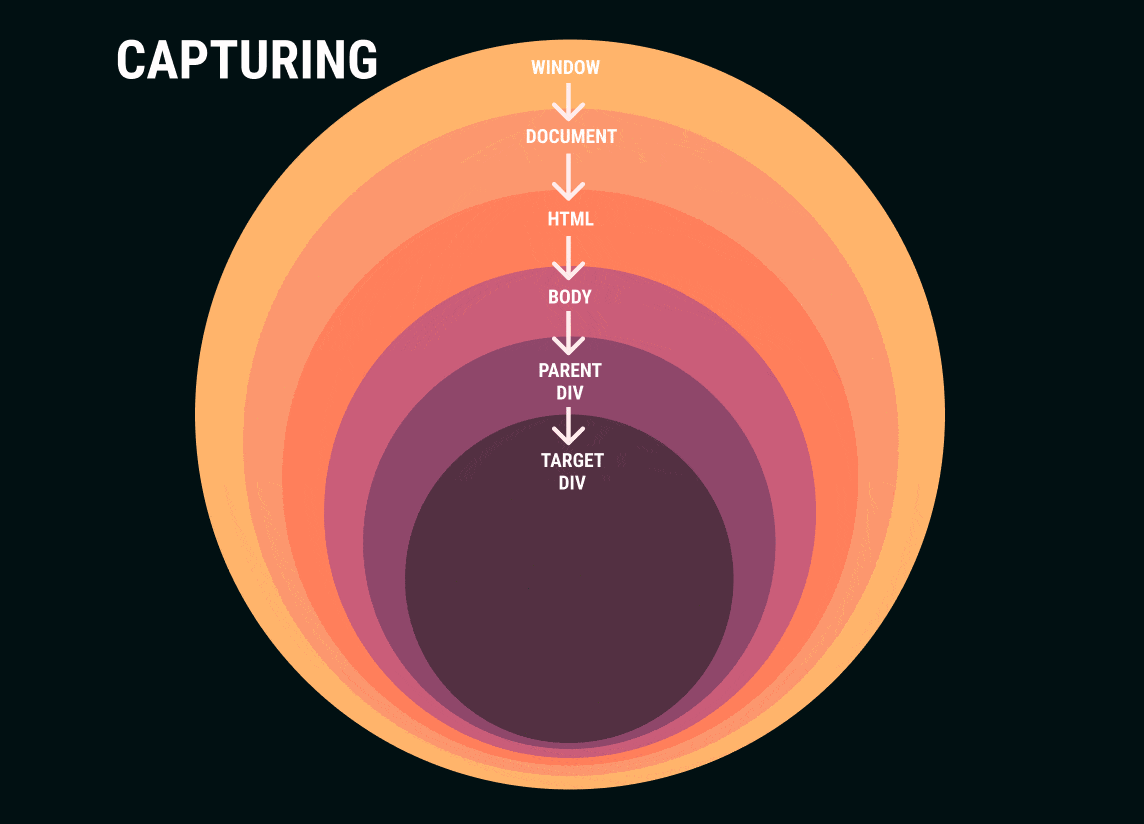
When a JavaScript event is triggered, it sends out a signal that will propagate (i.e. travel/broadcast) bidirectionally throughout parts of the Document Object Model (DOM) that are direct ancestors of the element that triggered the event, which allows you as the developer to respond to the event at different points in the DOM. This propagation process is composed of three separate phases known as the Capturing, Target, and Bubbling phases:
- Capturing - The event signal begins its travels at the top-most, global Window object, then travels down the DOM to the...
- Target - the element that triggered the event, then...
- Bubbling - it travels back up to the Window, taking the same path through the target element’s ancestors* that it took on the way down
* Ancestors include relationships like parent, grandparent, great-grandparent, etc. Events will not travel through elements that are siblings of the direct ancestral lineage of the target.
For the sake of illustration, let's assume we have a simplified HTML document that looks like this:
1<!DOCTYPE html>2<html id='great-grandparent'>3 <body id='grandparent'>4 <div id='sibling-of-parent'></div>5 <div id='parent'>6 <div id='target'></div>7 </div>8 </body>9</html>
If we were to target the <div> with the id of target and add an event listener to it that fires upon receiving notification of a user click inside that <div>, then the signal propagation flow would look like this:

The majority of events will propagate through all three phases, but there are a small minority of events (e.g. focus, blur) that only propagate through the two non-bubbling phases (note: the target phase always occurs). When you use addEventListener, the default behavior is for the listener to only listen for events propagating during bubbling, but if you want to instead tell the listener to only listen during the capturing phase then there is an optional third argument you can pass to addEventListener where you can specify that you only want to listen during capturing. You can implement this behavior either by passing the boolean value true in as the third argument (the default is false), or you could instead pass an object that includes a boolean property named capture (there are also some additional configuration options you can pass in when you use an object: MDN documentation).
Most of the time you’ll be listening for and handling events during the bubbling phase or target phase. The event listener and the event target are often the same element, but you can also take advantage of bubbling and put listeners higher up in the DOM than the target, and this allows for a helpful strategy of handling events known as Event Delegation.
Event Delegation
Before I get into Event Delegation I want to make sure that you're familiar with the following concepts:
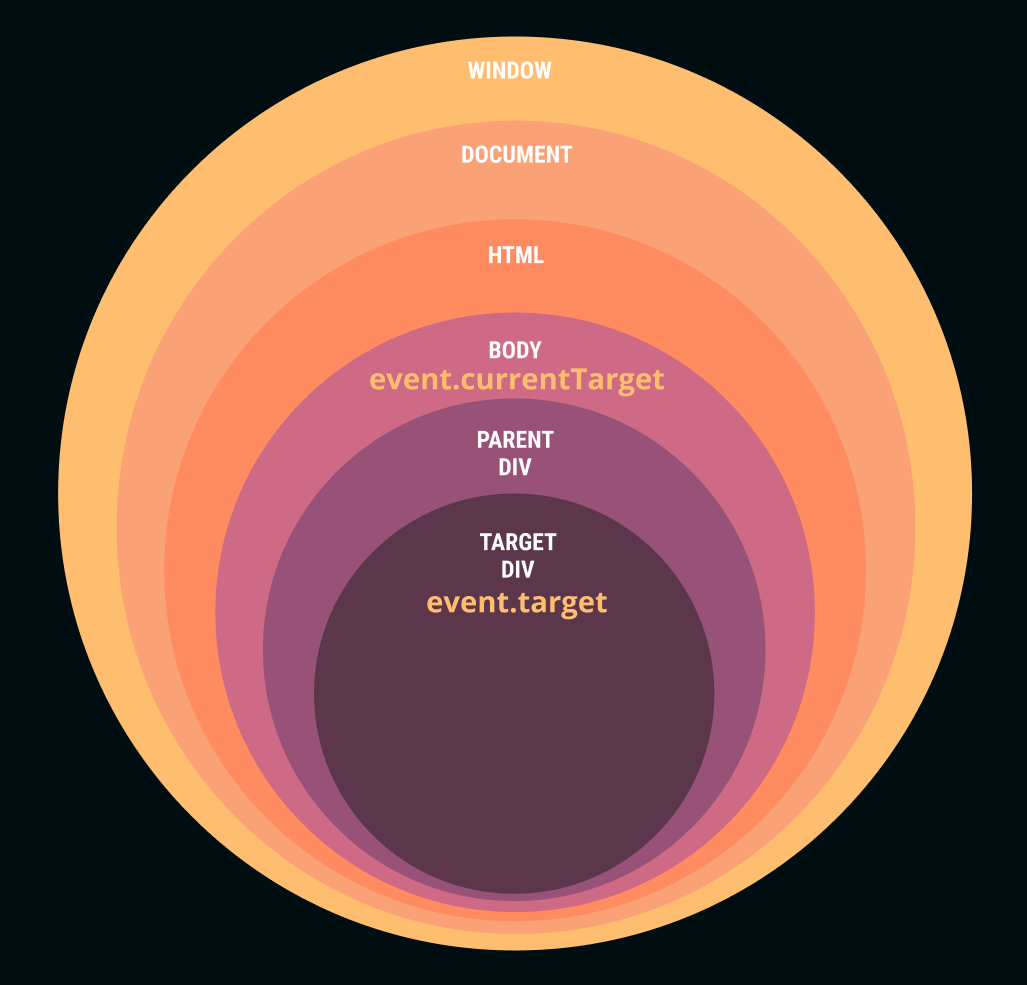
- Event Object - A JavaScript object that contains information about an event that has occurred. It contains a lot of different information about the event (including the properties below). This object is automatically passed in as the first argument of the function that handles an event (the parameter is often written as "event", "evt" or "e") so that you can read from it to determine what action, if any, the program should take.
- event.target - This property of the Event Object tells you the element that triggered a particular event.
- event.currentTarget - This property of the Event Object tells you what element has an event listener attached.
The target and currentTarget are often the same element, but when you have an event listener higher up in the DOM that's listening and handling an event that was triggered on a nested element lower in the DOM, then you're using the Event Delegation pattern. For instance, in our example HTML document, we could attach a 'click' event listener to the <body> element and handle the event when the user clicks on a nested element like the <div> with the id of "target":

What Event Delegation allows you to do is handle events efficiently from an element that is higher up in the DOM instead of attaching an event listener to each lower-level element that may potentially trigger an event that you'd like to handle. This helps save program memory and also saves you the need of writing code that adds an event listener to elements that are dynamically created after the initial page load.
To see an example of how Event Delegation looks with some code, here's a new, simplified HTML document containing a todo list:
1<!DOCTYPE html>2<html>3 <body>4 <input type='text' placeholder='Todo...' />5 <button id='add-todo-btn'>Add</button>67 <ul>8 <li data-id='todo-1'>9 <span>Learn about event delegation</span>10 <div>11 <button class='edit-todo-btn'>Edit</button>12 <button class='delete-todo-btn'>Delete</button>13 </div>14 </li>15 </ul>1617 </body>18</html>
So far we have one todo on the list ("Learn about event delegation") that we can assume has been saved to a database. Each rendered todo will consist of an a <li> element with an data-id attribute that represents the unique sting identification number of the todo that's saved to the database. Nested inside that <li> is a <span> with the todo text, a <button> to edit the todo text, and another to delete the todo (I've nested these buttons inside of a <div> just to make it easier to style the list items with Flexbox). If the user selects the Edit button, the span will change to an input with the todo text and the Edit and Delete buttons will change to Cancel (as in cancel the edit) and Save, respectively. All four different types of buttons will have a class that identifies the buttons.
A somewhat naive solution to handling the button clicks would be to add one event listener for each button of each todo. The better way to handle it would be to rely on event delegation and just add one event listener to a common ancestral element like the <ul>, and then in the handler function use the event.target and some simple logic to determine what button was clicked and which todo ID it corresponds to so we know which ID to target in our database:
1function handleTodoClick(e) {2 const { classList, parentElement } = e.target;3 const targetLi = parentElement.closest('li');4 switch (classList[0]) {5 case 'delete-todo-btn':6 deleteItem(targetLi);7 break;8 case 'edit-todo-btn':9 handleEditTodoText(targetLi);10 break;11 case 'save':12 saveUpdatedTodo();13 break;14 case 'cancel':15 renderTodos();16 break;17 default:18 console.log('nothing important was clicked');19 }20}
Here we have a switch statement (if you're not familiar with switch syntax yet, it's just a more streamlined way to handle more lengthy if/then logic) with four separate cases that handle each of the buttons that the user might select. Since we're relying on event delegation and we don't have an event listener attached to each button, we just have to be sure we have some logic like this in place in order to determine which button was selected (the default case would be for if the user selects somewhere within the list that isn't a button, in which case we do nothing but log a message to the console). So there is a bit of tradeoff in that we typically have to add a bit more logic when we use delegation, but at least we can keep our code clean and un-littered from countless unnecessary event listeners!